
TensorRT
简介
介绍
-
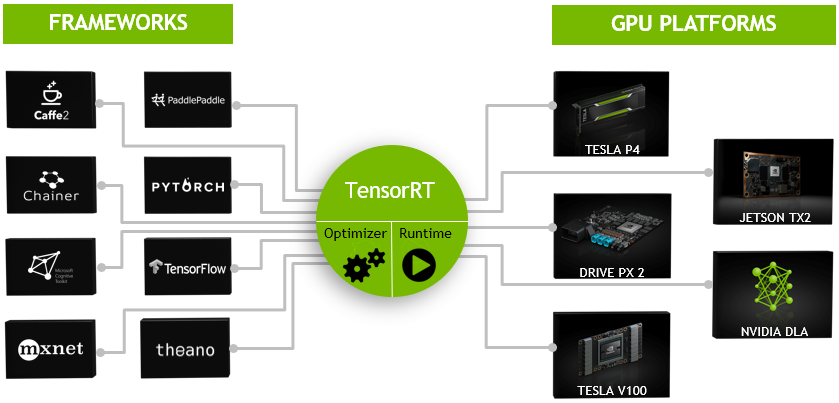
TensorRT是一个高性能的深度学习推理(Inference)优化器,可以为深度学习应用提供低延迟、高吞吐率的部署推理。TensorRT可用于对超大规模数据中心、嵌入式平台或自动驾驶平台进行推理加速。TensorRT现已能支持TensorFlow、Caffe、Mxnet、Pytorch等几乎所有的深度学习框架,将TensorRT和NVIDIA的GPU结合起来,能在几乎所有的框架中进行快速和高效的部署推理。
-
TensorRT 是一个C库,从 TensorRT 3 开始提供C API和Python API,主要用来针对 NVIDIA GPU进行 高性能推理(Inference)加速。现在最新版TensorRT是4.0版本。
-
可以认为tensorRT是一个只有前向传播的深度学习框架,这个框架可以将 Caffe,TensorFlow的网络模型解析,然后与tensorRT中对应的层进行一一映射,把其他框架的模型统一全部 转换到tensorRT中,然后在tensorRT中可以针对NVIDIA自家GPU实施优化策略,并进行部署加速。
-
目前TensorRT4.0 几乎可以支持所有常用的深度学习框架,对于caffe和TensorFlow来说,tensorRT可以直接解析他们的网络模型;对于caffe2,pytorch,mxnet,chainer,CNTK等框架则是首先要将模型转为 ONNX 的通用深度学习模型,然后对ONNX模型做解析。而tensorflow和MATLAB已经将TensorRT集成到框架中去了。
-
ONNX(Open Neural Network Exchange)是微软和Facebook携手开发的开放式神经网络交换工具,也就是说不管用什么框架训练,只要转换为ONNX模型,就可以放在其他框架上面去inference。这是一种统一的神经网络模型定义和保存方式,上面提到的除了tensorflow之外的其他框架官方应该都对onnx做了支持,而ONNX自己开发了对tensorflow的支持。从深度学习框架方面来说,这是各大厂商对抗谷歌tensorflow垄断地位的一种有效方式;从研究人员和开发者方面来说,这可以使开发者轻易地在不同机器学习工具之间进行转换,并为项目选择最好的组合方式,加快从研究到生产的速度。
支持的层
| 层 | 支持 |
|---|---|
| Activation | ReLU, tanh and sigmoid |
| Concatenation | : Link together multiple tensors across the channel dimension. |
| Convolution | 3D,2D |
| Deconvolution | Fully |
| ElementWise | sum, product or max of two tensors |
| Pooling | max and average |
| Padding | Flatten |
| SoftMax | cross-channel only |
| RNN | RNN, GRU, and LSTM |
| Scale | Affine transformation and/or exponentiation by constant values |
| Shuffle | Reshuffling of tensors , reshape or transpose data |
| Squeeze | Removes dimensions of size 1 from the shape of a tensor |
| Unary | Supported operations are exp, log, sqrt, recip, abs and neg |
| Plugin | integrate custom layer implementations that TensorRT does not natively support. |
-
基本上比较经典的层比如,卷积,反卷积,全连接,RNN,softmax等,在tensorRT中都是有对应的实现方式的,tensorRT是可以直接解析的。
-
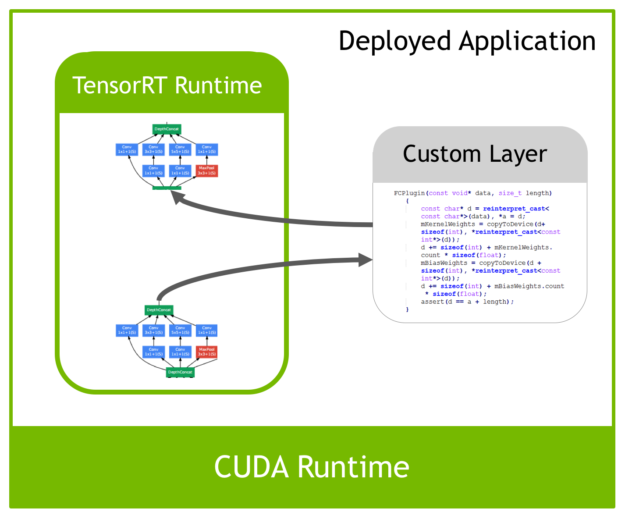
但是由于现在深度学习技术发展日新月异,各种不同结构的自定义层(比如:STN)层出不穷,所以tensorRT是不可能全部支持当前存在的所有层的。那对于这些自定义的层tensorRT中有一个 Plugin 层,这个层提供了 API 可以由用户自己定义tensorRT不支持的层。
优化方式
-
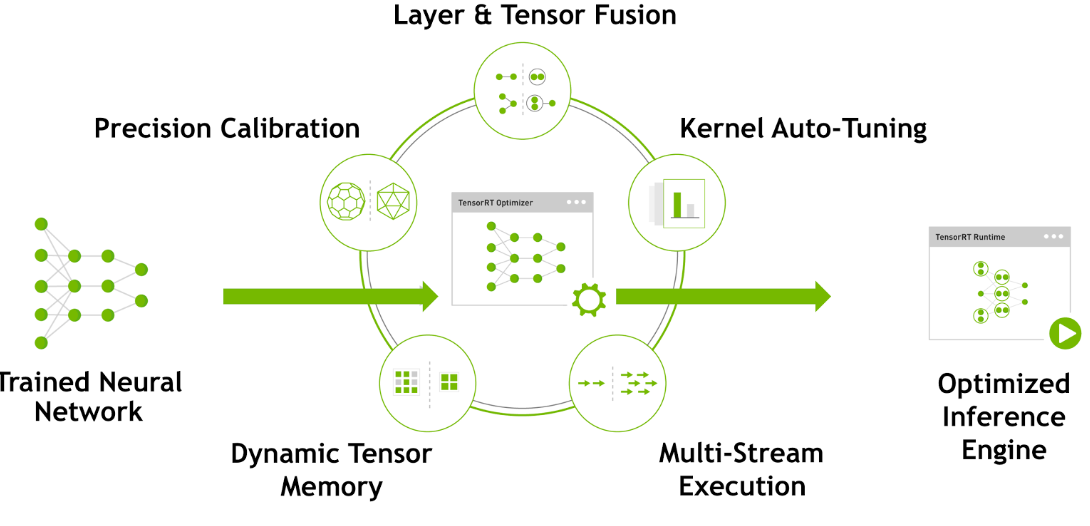
TensorRT优化方法主要有以下几种方式,最主要的是两种:层间融合或张量融合(Layer & Tensor Fusion)、数据精度校准(Weight &Activation Precision Calibration)。
安装
cuda
配置环境变量
export CUDA_HOME=/usr/local/cuda |
linux
# 这里改为自己对应的cuda版本 |
-
安装好后,使用
$ dpkg -l | grep TensorRT命令检测是否成功 -
安装后会在 /usr/src 目录下生成一个 tensorrt 文件夹,里面包含 bin , data , python , samples 四个文件夹, samples 文件夹中是官方例程的源码; data , python 文件中存放官方例程用到的资源文件,比如caffemodel文件,TensorFlow模型文件,一些图片等;bin 文件夹用于存放编译后的二进制文件。
-
可以把 tensorrt 文件夹拷贝到用户目录下,方便自己修改测试例程中的代码。
-
进入 samples 文件夹直接 make,会在 bin 目录中生成可执行文件,可以一一进行测试学习。
-
另外tensorRT是不开源的, 它的头文件位于
/usr/include/x86_64-linux-gnu目录下,共有七个 -
tensorRT的库文件位于
/usr/lib/x86_64-linux-gnu目录下 -
环境变量
# tensorrt |
安装pycuda
- 使用python接口的tensorRT,需要安装pycuda
pip install pycuda |
- 测试
import tensorrt |
安装opencv
- 建议使用opencv3版本,在cmake时手动指定CUDA参数
git clone "https://github.com/opencv/opencv.git" |
- 配置
//Build CUDA modules stubs when no CUDA SDK |
windows
-
解压,设置系统环境变量
-
复制dll文件到cuda安装目录
-
完成tensorRT安装后,测试看安装是否成功,可以直接编译刚才解压的TensorRT里的案例来测试。这里我们选用sampleMNIST来测试。流程
功能介绍
流程
| 流程 | 说明 |
|---|---|
| 模型训练 | 导出得到模型权重文件,例如onnx、tensorflow、caffe等 |
| builder | 模型优化器,构建器将网络模型定义作为输入,执行与设备无关和针对特定设备的优化,并创建引擎 |
| network definition | 模型表示,定义网络张量和运算符的图 |
| engine | 由构建器优化的模型表示,推理引擎用于序列化和反序列化,保存和解析构建的优化模型 |
| plan | 计划文件,序列化格式的推理引擎。初始化推理引擎,应用程序首先从plan文件中反序列化模型 |
| runtime | 执行推理,输入数据即可得到输出结果 |
- build阶段会根据网络定义,执行包括平台特定优化,生成特定的推理引擎。这个阶段可能会花费大量时间,所以将其序列化为plan文件以供以后使用
- 其中构建时的优化包括:
- 消除不使用的输出层
- 消除等同于无操作的内容
- 卷积、偏置和relu操作融合
- 使用完全相似的参数和相同的源的张量进行操作聚合,例如gooleNetv5的初始模块汇总1x1卷积
- 将层输出定向到正确的最终目的地来合并拼接层
工作流
| 工作流 | 说明 |
|---|---|
| 导出模型 | |
| 设定batch size | 推断时的batch size |
| 设定精度 | 推理时使用较低精度提供更快的计算速度和更低的内存消耗。支持TF32、FP32、FP16、INT8精度 |
| 模型转换 | 模型从onnx、wts等转换为tensorrt引擎。三种方式:1、使用TF-TRT;2、onnx文件自动转换;3、使用tensorrt API手动创建网络(最高的性能) |
| 部署模型 | 两种类型的runtime,C++和python绑定的独立runtime,以及tensorflow的原生集成的runtime。三种方式:1、tensorflow部署;2、使用tensorrt runtime API部署;3、使用NVIDIA推理服务器部署; |
| 精度范围 | 动态范围 | 最小精度 |
|---|---|---|
| FP32 | ||
| FP16 | ||
| INT8 |
使用
创建网络
原始api搭建
- 创建builder和网络
IBuilder* builder = createInferBuilder(gLogger); |
- 定义网络输入输出
Add the Input layer to the network, with the input dimensions, including dynamic batch. A network can have multiple inputs, although in this sample there is only one:
auto data = network->addInput(INPUT_BLOB_NAME, dt, Dims3{-1, 1, INPUT_H, INPUT_W}); |
- 添加卷积层
Add the Convolution layer with hidden layer input nodes, strides and weights for filter and bias. In order to retrieve the tensor reference from the layer, we can use:
auto conv1 = network->addConvolution(*data->getOutput(0), 20, DimsHW{5, 5}, weightMap["conv1filter"], weightMap["conv1bias"]); |
Note: Weights passed to TensorRT layers are in host memory.
- 添加池化层
Add the Pooling layer:
auto pool1 = network->addPooling(*conv1->getOutput(0), PoolingType::kMAX, DimsHW{2, 2}); |
- 全连接和激活层
Add the FullyConnected and Activation layers:
auto ip1 = network->addFullyConnected(*pool1->getOutput(0), 500, weightMap["ip1filter"], weightMap["ip1bias"]); |
- softmax层
Add the SoftMax layer to calculate the final probabilities and set it as the output:
auto prob = network->addSoftMax(*relu1->getOutput(0)); |
- 输出
Mark the output:
network->markOutput(*prob->getOutput(0)); |
通过已生成网络搭建
- parse解析器支持:ONNX、UFF、Caffe的方式,导入网络模型
//ONNX: |
- 解析Caffe网络
//Create the builder and network: |
创建engine
Build the engine using the builder object:
IBuilderConfig* config = builder->createBuilderConfig(); |
When the engine is built, TensorRT makes copies of the weights.
- 释放资源
Dispense with the network, builder, and parser if using one.
parser->destroy(); |
序列化模型
- 序列化模型
Run the builder as a prior offline step and then serialize:
IHostMemory *serializedModel = engine->serialize(); |
- 反序列化
Create a runtime object to deserialize:
IRuntime* runtime = createInferRuntime(gLogger); |
执行模型
Create some space to store intermediate activation values. Since the engine holds the network definition and trained parameters, additional space is necessary. These are held in an execution context:
IExecutionContext *context = engine->createExecutionContext(); |
An engine can have multiple execution contexts, allowing one set of weights to be used for multiple overlapping inference tasks. For example, you can process images in parallel CUDA streams using one engine and one context per stream. Each context will be created on the same GPU as the engine.
Use the input and output blob names to get the corresponding input and output index:
int inputIndex = engine->getBindingIndex(INPUT_BLOB_NAME); |
Using these indices, set up a buffer array pointing to the input and output buffers on the GPU:
void* buffers[2]; |
TensorRT execution is typically asynchronous, so enqueue the kernels on a CUDA stream:
context->enqueueV2(buffers, stream, nullptr); |
It is common to enqueue asynchronous memcpy() before and after the kernels to move data from the GPU if it is not already there. The final argument to enqueueV2() is an optional CUDA event which will be signaled when the input buffers have been consumed and their memory may be safely reused.
To determine when the kernel (and possibly memcpy()) are complete, use standard CUDA synchronization mechanisms such as events, or waiting on the stream.
INT8加速
流程
- 准备校准图片(calibration images),保存在
tensorrtx/yolov5/build - yolov5.cpp设置宏:
#define USE_INT8 make && sudo ./yolov5 -s && sudo ./yolov5 -d ../samples
示例
- 下面代码是一个简单的build过程
IBuilder* builder = createInferBuilder(gLogger); |
GPU编程
- 由于GPU处理核心更多,在处理并行运算时比CPU更高效。
| CPU | GPU | 层次 |
|---|---|---|
| 算术逻辑和控制单元 | 流处理器SM | 硬件 |
| 算术单元 | 批量处理器SP | 硬件 |
| 进程 | block | 软件 |
| 线程 | thread | 软件 |
| 调度单位 | warp | 软件 |
C
cuda C是对常规c的扩展,加入了一些函数前缀
| 前缀 | 执行位置 | 调用位置 |
|---|---|---|
| device float DeviceFunc() | device | device |
| global float KernelFunc() | device | host |
| host float HostFunc() | host | host |

-
一个grid线程两个内置的坐标变量:blockIdx和threadIdx
-
barrier同步等待,由于并发特性,程序里用到计算结果时,等待所有kernel计算完成再继续
__syncthreads(); |
| 七个步骤 | 说明 |
|---|---|
cudaSetDevice(0); |
获取设备,默认0,只有一个GPU可以省略 |
cudaMalloc((void**))& d_a,sizeof(float)*n); |
分配显存 |
cudaMemcpy(d_a,a,sizeof(float)*n,cudaMemcpyHostToDevice); |
数据传输至GPU |
gpu_kernel<<<blocks, threads>>>(***); |
kernel函数 |
cudaMemcpy(a,d_a,sizeof(float)*n,cudaMemcpyDeivceToHost); |
数据传输至CPU |
cudaFree(d_a); |
释放显存 |
cudaDeviceReset(); |
重置设备,可以省略 |
//kernel definition |
CPP
实践
yolov5
- 使用tensorrt API搭建的yolov5网络生成的wts文件,yolov-tensorrtX
- 生成wts文件
python gen_wts.py # 将gen_wts.py放在yolov5文件夹下,再将生成的yolov5.wts,放在tensorrtx/yolov5文件夹下 |
- 编译前修改yolov5.cpp的类型
#define Net s:可以为s,m,l,x等,yololayer.h文件下类别个数CLASS_NUM
mkdir build |
- 执行tensorRT加速后的yolov5
sudo ./yolov5 -s # 序列化 |
- 使用python执行加速
python yolov5_trt.py |